经管之家App
让优质教育人人可得
立即打开


what深度学习
why深度学习
:传统机器学习依赖于手工提取特征,而其能够自动学习数据的特征,省去了复杂的特征提取和选择过程。处理复杂数据:深度学习擅长处理非结构化数据how深度学习
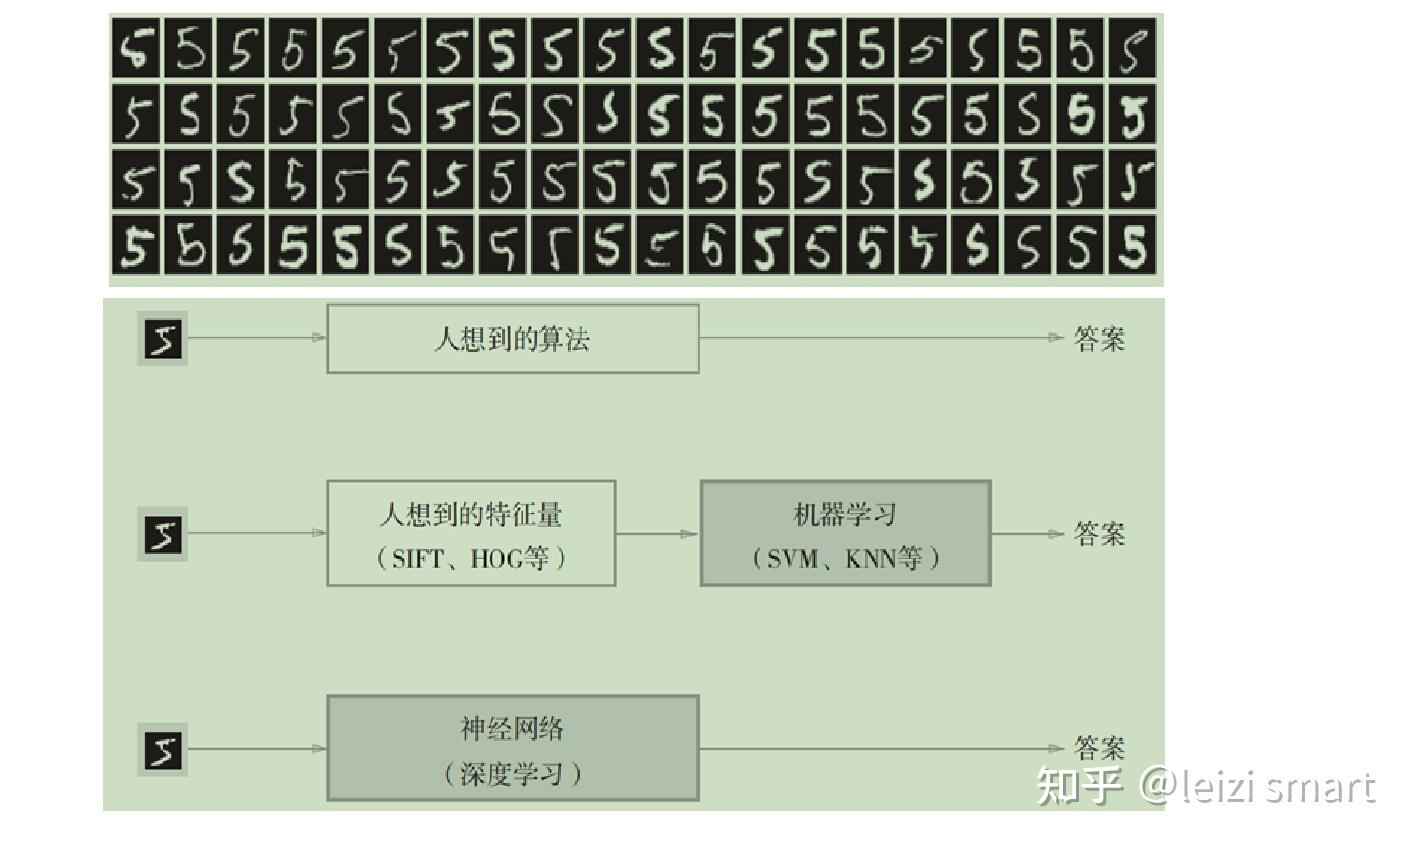
深度学习的学习的三个层次

经典程序设计和机器学习的区别

机器学习和深度学习的区别
深度学习原理
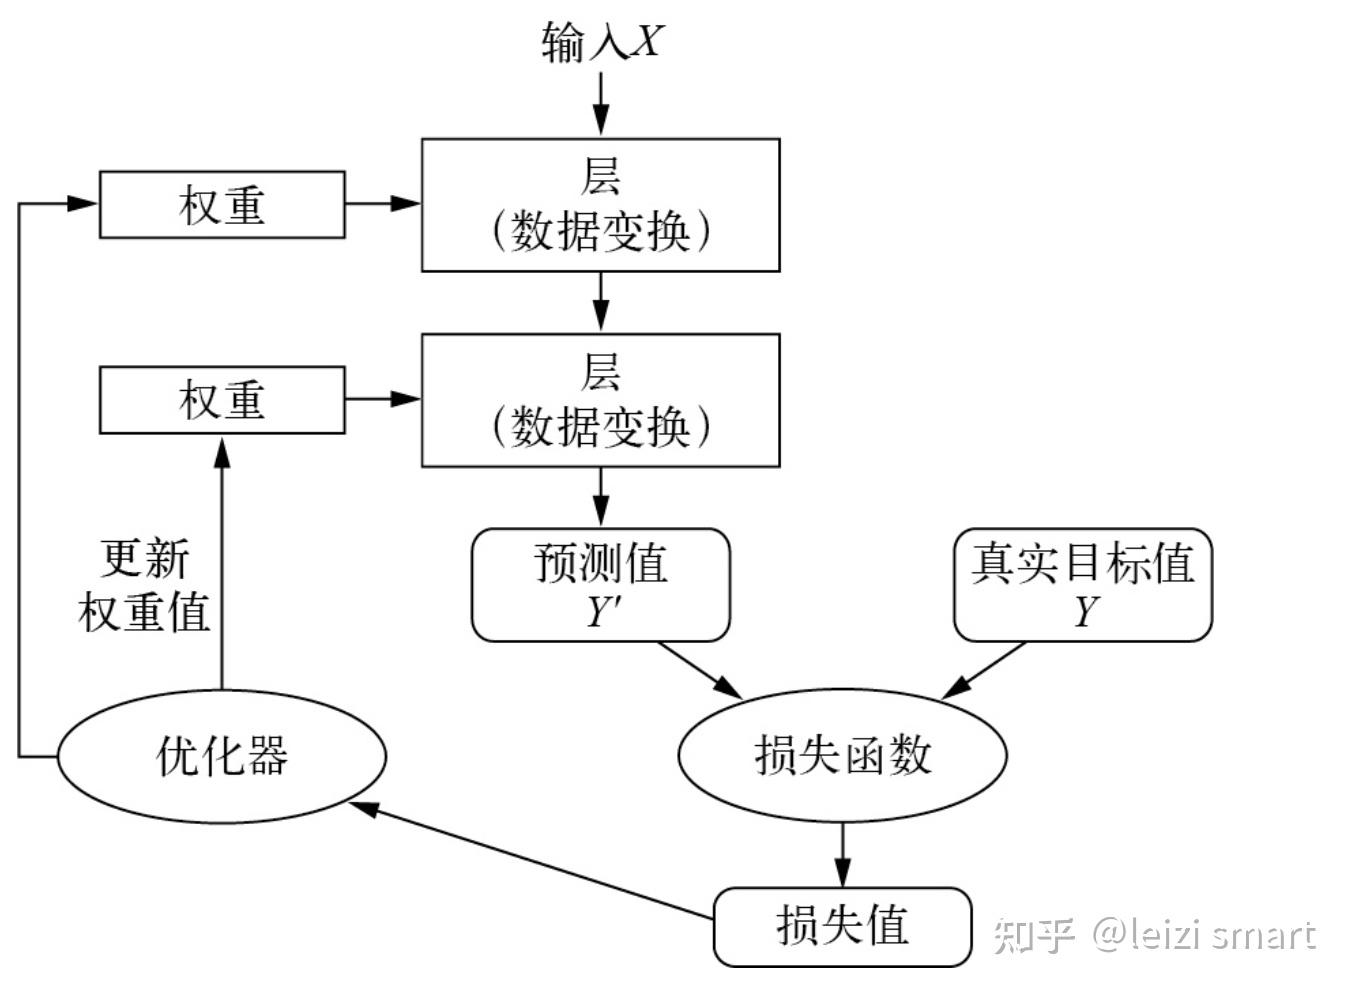
学习就是为神经网络的所有层找到一组正确的权重值,训练神经网络主要围绕以下四个方面。
从机器学习scikit-learn到深度学习pytorch
what-pytorch
PyTorch是由Facebook的AI研究团队开发的基于 Python 的科学计算包,是一个高灵活性、速度快的深度学习平台。基于以下两个目的而开发的python深度学习框架:
why-pytorch
how-pytorch
pytorch概述,代码实现
########################################################## pytorch概述########################################################import torchprint(torch.__version__) # 2.1.0print("pytorch和Numpy许多功能类似,无缝替换NumPy,利用GPU加速神经网络的运算")print("自动微分机制让神经网络的实现变得容易")# print("#"*56)# dir(torch)# dir(torch.nn)# help(torch.arange)1. torch
这个模块是PyTorch的核心模块,提供了多维数组(张量)的操作,这些操作在很多方面类似于NumPy,但可以在GPU上运行以加速计算。
2. torch.nn
这个模块提供了构建神经网络所需的所有构建块。它定义了一系列预制的层,如全连接层、卷积层、激活函数等,以及用于构建自定义网络的工具。
3. torch.optim
优化器在训练过程中用于更新网络权重。torch.optim模块提供了各种优化算法,如SGD、Adam和RMSprop。
4. torch.autograd
自动微分是PyTorch的一个核心特性,允许自动计算神经网络中的梯度。这对于实现反向传播至关重要。
这个模块提供了处理和加载数据的工具,是构建高效、可扩展的数据输入管道的关键。
6. torchvision
虽然不是PyTorch核心库的一部分,但torchvision常用于处理图像数据。它提供了常见的数据集、模型架构和图像转换工具。
其他与深度学习相关的工具和库,如:
张量是多维数组,目的是把向量、矩阵推向更高的维度。
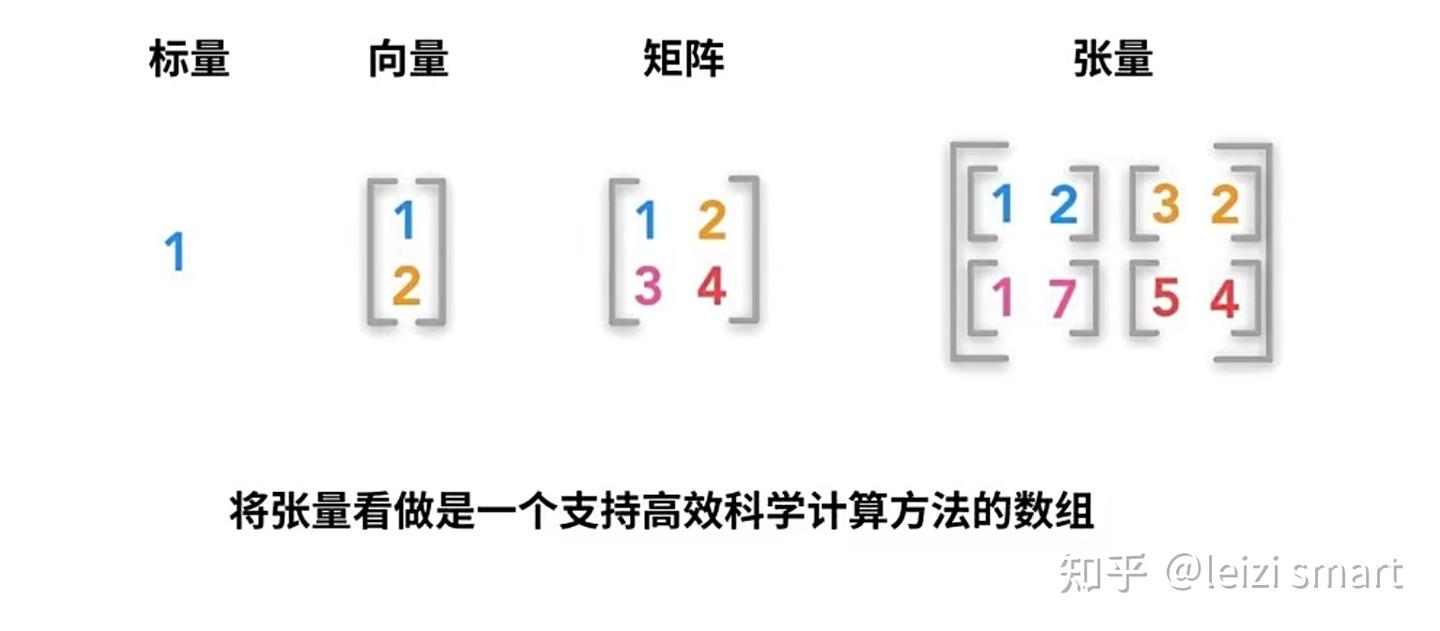
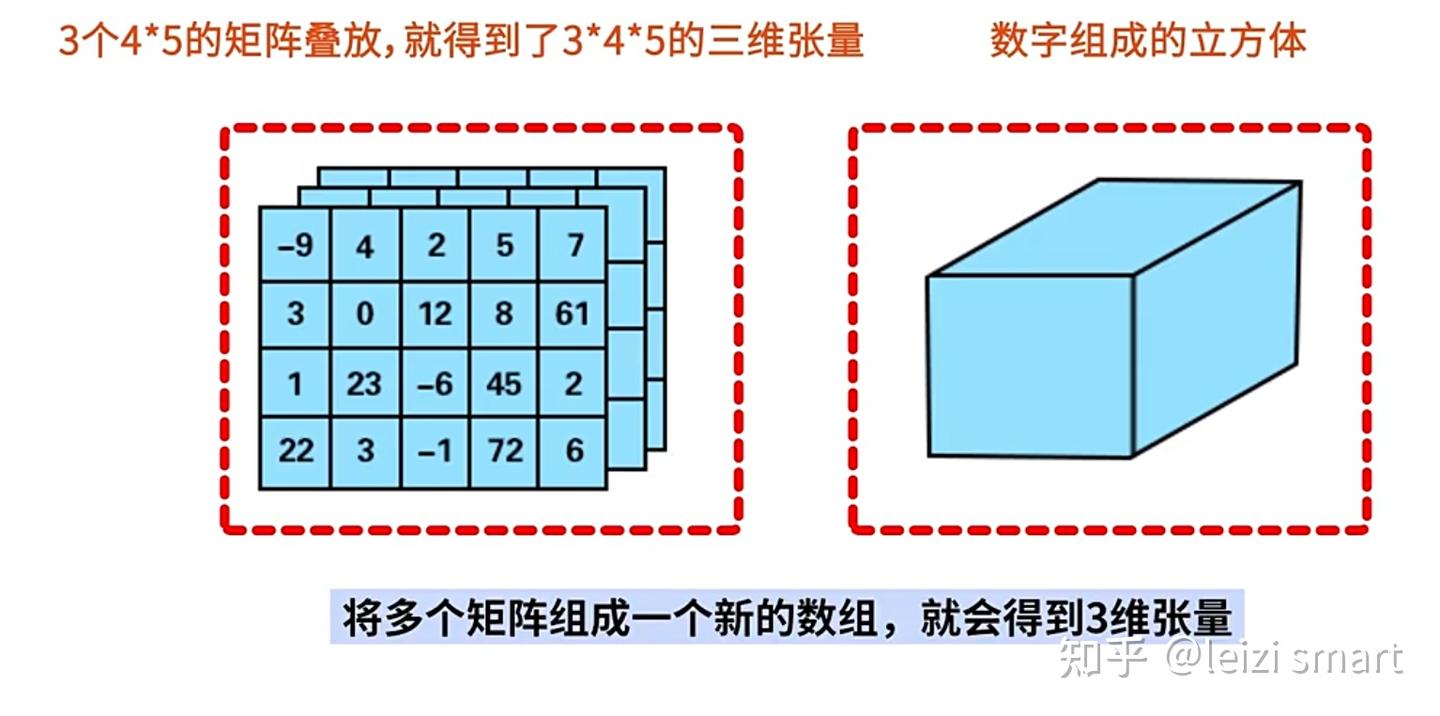
张量的维度:有几层中括号,就是多少维的张量
| 张量维度 | 内容 |
| 0维张量 | 标量 |
| 1维张量 | 向量 |
| 2维张量 | 矩阵 |
| 3维张量 | 彩色图像有rgb三个通道 |
| 4维张量 | 视频 |
实践:
1张量创建代码实现
########################################################## 1张量创建########################################################import torch# torch.randint(0,10,(2,3)) # [low,high),sizetensor1 = torch.rand(2, 3)print("1随机数值在0到1之间,均匀分布的张量:")print(tensor1)tensor2 = torch.zeros(2, 3)print("2全零张量:")print(tensor2)tensor3 = torch.ones(2, 3)print("3全一张量:")print(tensor3)import numpy as npnumpy_array = np.array([1, 2, 3])tensor4 = torch.from_numpy(numpy_array)print("4NumPy数组创建张量:")print(tensor4)list_data = [4, 5, 6]tensor5 = torch.tensor(list_data)print("5列表创建张量:")print(tensor5)2张量属性代码实现
################################################################### 2张量属性:维度,形状,数据类型,存储和计算设备# 张量6个属性# data: 被包装的 Tensor# ndim: 张量的维度,有几层中括号,就是多少维的张量# dtype: 张量的数据类型,如 torch.FloatTensor,torch.cuda.FloatTensor# shape: 张量的形状。如 (2,3)# device: 张量所在设备 (CPU/GPU),GPU 是加速计算的关键# grad: data的梯度。# requires_grad: 指示是否需要梯度,并不是所有的张量都需要计算梯度。################################################################### 张量操作:张量支持各种数学操作,如加法、乘法、卷积、池化等import torchscalar = torch.tensor(5)print("零阶张量(标量):")print(scalar)vector = torch.tensor([1, 2, 3])print("一阶张量(向量):")print(vector)matrix = torch.tensor([[1, 2, 3], [4, 5, 6]])print("二阶张量(矩阵):")print(matrix)# 创建一个从0到5,步长为1,形状为(2, 3),数据类型为float32的类型张量tensor = torch.arange(6, dtype=torch.float32).reshape(2, 3)print(tensor)# 输出张量的维度、形状、数据类型、存储设备print("维度 (Number of dimensions):", tensor.dim(), tensor.ndim)print("形状 (Shape):", tensor.shape, tensor.size())print("数据类型 (Data Type):", tensor.dtype)print("存储设备 (Device):", tensor.device)# 类型转换tensor = torch.randint(1,5,(2,3))tensor_float = tensor.float()print(tensor.dtype, tensor_float.dtype)3.1张量操作:数学操作,如加法、乘法代码实现
################################################################### 3.1张量操作:数学操作,如加法、乘法################################################################### 创建张量tensor1 = torch.tensor([1, 2, 3], dtype=torch.float32)tensor2 = torch.tensor([4, 5, 6], dtype=torch.float32)addition_result = tensor1 + tensor2print("张量加法addition_result:", addition_result)multiplication_result = tensor1 * tensor2print("张量乘法multiplication_result:", multiplication_result)division_result = tensor1 / tensor2print("张量除法division_result:", division_result)squared_tensor = torch.square(tensor1)print("逐元素平方squared_tensor:", squared_tensor)mean_value = torch.mean(tensor1)print("均值mean_value:", mean_value)variance = torch.var(tensor1)print("方差variance:", variance)min_value = torch.min(tensor1)print("最小值min_value:", min_value)print("最小值min_value的位置(索引):", torch.argmin(min_value).item())3.2张量操作:访问张量中的元素,索引和切片,代码实现
################################################################### 3.2张量操作:访问张量中的元素,索引和切片##################################################################tensor3 = torch.arange(6, dtype=torch.float32).reshape(2, 3)# 访问张量中的特定元素element = tensor3[1, 1].item()print(element)element = tensor3[1, 1]print(element)# 张量索引和切片element = tensor3[1] # 获取索引为2的元素print(element)sliced_tensor = tensor3[:,1:2] # 切片获取部分张量print(sliced_tensor)3.3张量操作:维度变化,代码实现
################################################################### 3.3张量操作:维度变化################################################################### 增加新的维度,在0轴前添加新维度tensor = torch.arange(4, dtype=torch.float32).reshape(2, 2)new_tensor = tensor.unsqueeze(0)print(new_tensor, new_tensor.shape)# 删除维度,删除0轴维度new_tensor = new_tensor.squeeze(0)print(new_tensor, new_tensor.shape)# 更改张量的形状new_tensor = tensor.view(1, 4) # 改为形状为(1, 4)的张量print(new_tensor, new_tensor.shape)# 按0维分成两块tensor1, tensor2 = torch.split(tensor, split_size_or_sections=1, dim=0)print(tensor1, tensor2)# 沿着新的轴(0轴)叠加stacked_tensor = torch.stack((tensor1, tensor2), dim=0)print(stacked_tensor)3.4张量操作:广播机制,代码实现
################################################################### 3.4张量操作:广播机制# Pytorch的广播规则和numpy是一样的:广播要满足两个条件:# 每一个张量只有有一个一维的维度# 满足右对齐,m*n * 1*n; m*1 * 1*n##################################################################tensor1 = torch.tensor([1,2,3])tensor2 = torch.tensor([[0,0,0],[1,1,1],[2,2,2]])print(tensor1 + tensor2)3.5张量操作:矩阵svd分解,代码实现
################################################################### 3.5张量操作:矩阵svd分解# svd分解可以将任意一个矩阵分解为一个正交矩阵u,一个对角阵s和一个正交矩阵v.t()的乘积# svd常用于矩阵压缩和降维##################################################################a=torch.tensor([[1.0,2.0],[3.0,4.0],[5.0,6.0]])u,s,v = torch.svd(a)print(u,"\n")print(s,"\n")print(v,"\n")print(u@torch.diag(s)@v.t())t.tensor和t.Tensor的区别
代码实现
import torch as t#使用小写的tensor函数 #根据传入的整型数据,创建整型的张量a = t.tensor([1, 2, 3, 4, 5])print(a) # tensor([1, 2, 3, 4, 5])print(a.type()) # torch.LongTensor#使用大写的tensor类,会创建浮点类型b=t.Tensor([1, 2, 3, 4, 5])print(b) # tensor([1., 2., 3., 4., 5.])print(b.type()) # torch.FloatTensor常见激活函数
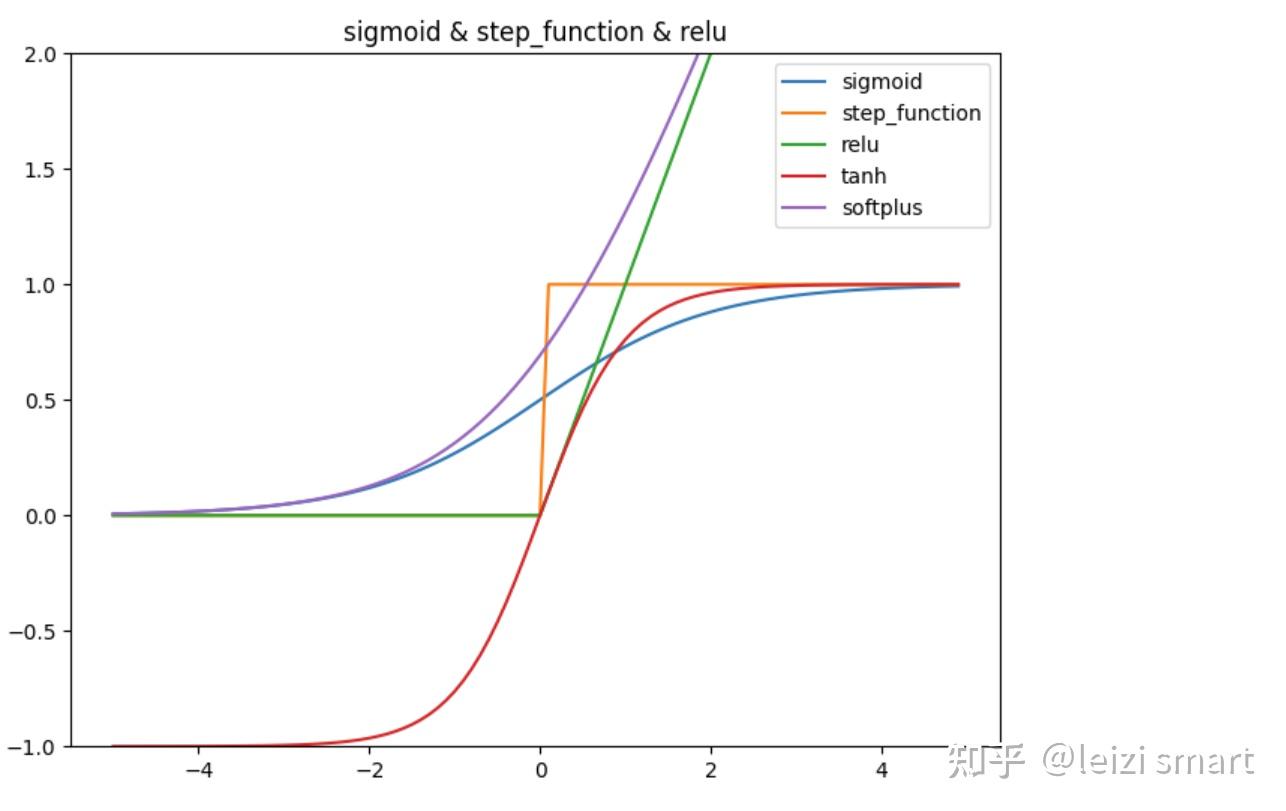
手动实现激活函数,代码实现
import numpy as npimport matplotlib.pylab as pltdef sigmoid(x): return 1 / (1 + np.exp(-x))def step_function(x): return np.where(x > 0, 1, 0) #np.array(x > 0, dtype=int)def relu(x): return np.maximum(0, x)def tanh(x): return np.tanh(x)def softplus(x): return np.log(1 + np.exp(x))X = np.arange(-5.0, 5.0, 0.1)Y1 = sigmoid(X)Y2 = step_function(X)Y3 = relu(X)Y4 = tanh(X)Y5 = softplus(X)plt.figure(figsize=(8, 6))plt.plot(X, Y1, label="sigmoid")plt.plot(X, Y2, label="step_function")plt.plot(X, Y3, label="relu")plt.plot(X, Y4, label="tanh")plt.plot(X, Y5, label="softplus")plt.ylim(-1, 2)plt.title('sigmoid & step_function & relu')plt.legend()plt.show()pytorch中的激活函数

调用pytorch中的激活函数,代码实现
import torchimport matplotlib.pyplot as plt# 定义绘制激活函数图表的函数def plot_activation_function(ax, function, name): x = torch.linspace(-5, 5, 100) y = function(x).numpy() ax.plot(x.numpy(), y, label=name) ax.set_title(name + ' Activation Function') ax.set_xlabel('Input') ax.set_ylabel('Output') ax.grid(True) ax.legend()# 创建一个包含多个子图的画布fig, axes = plt.subplots(1, 3, figsize=(18, 6)) # 1行,3列# 可视化不同的激活函数# ReLU 激活函数plot_activation_function(axes[0], torch.nn.ReLU(), 'ReLU')# Sigmoid 激活函数plot_activation_function(axes[1], torch.nn.Sigmoid(), 'Sigmoid')# Tanh 激活函数plot_activation_function(axes[2], torch.nn.Tanh(), 'Tanh')# 调整布局并显示图像plt.tight_layout()plt.show()1标量梯度计算,代码实现
2非标量梯度计算,代码实现
################################################################### 梯度计算:2非标量的反向传播,传入一个和它同形状的gradient参数张量##################################################################import numpy as npimport torch# f(x) = a*x**2 + b*x + cx = torch.ones((2,2), requires_grad=True)a = torch.tensor(2.0)b = torch.tensor(-8.0)c = torch.tensor(12.0)y = a*torch.pow(x,2) + b*x + cgradient = torch.ones_like(x) # 保留 x_data 的属性y.backward(gradient = gradient)x_grad = x.gradprint("x_grad:\n",x_grad)3利用自动微分和优化器求最小值,代码实现
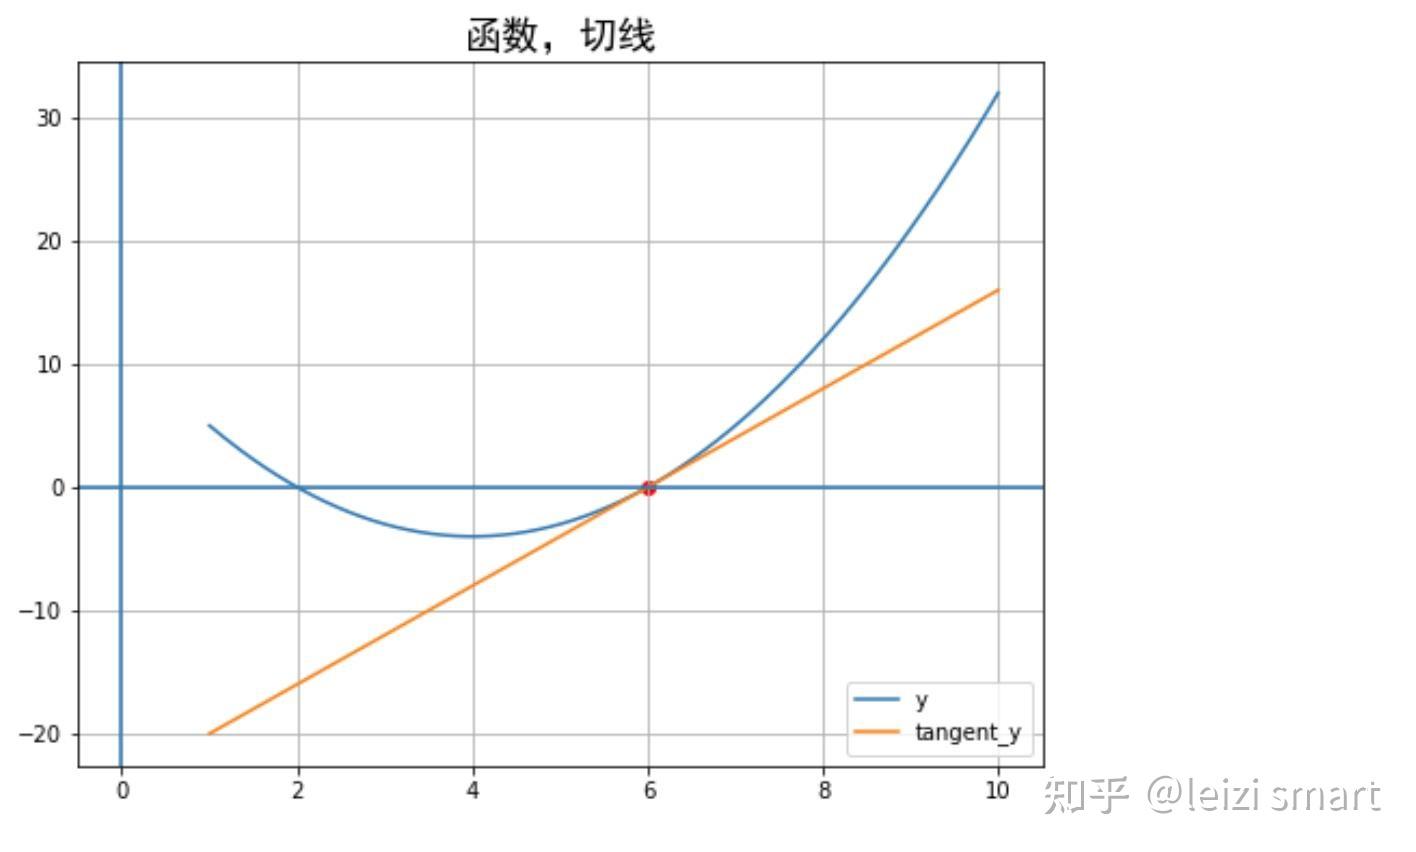
################################################################### 梯度计算:3利用自动微分和优化器求函数最小值##################################################################import torch# f(x) = a*x**2 + b*x + cx = torch.tensor(1.0, requires_grad = True) # x需要被求导a = torch.tensor(2.0)b = torch.tensor(-8.0)c = torch.tensor(12.0)optimizer = torch.optim.SGD(params=[x],lr = 0.01)def f(x): result = a*torch.pow(x,2) + b*x + c return(result)for i in range(500): optimizer.zero_grad() y = f(x) y.backward() optimizer.step()print("利用自动微分和优化器求函数最小值y=",f(x).data,";","x=",x.data)4求偏导数,代码实现
# (a) --> (x)# \ / \# . (z)# / \ /# (b) --> (y)# x = 2a + 3b# y = 5a^2 + 3b^3# z = 2x + 3y# dz/da = dz/dx * dx/da + dz/dy * dy/da# = 2 * 2 + 3 * 10a# = 4 + 30a# a = 3.5, dz/da = 64 import torch a = torch.tensor(2.0, requires_grad=True)b = torch.tensor(1.0, requires_grad=True)x = 2*a + 3*by = 5*a*a + 3*b*b*bz = 2*x + 3*yz.backward()print(a.grad) # tensor(64.)PyTorch和NVIDIA GPU以及CUDA的关系:
GPU加速,代码实现
import numpy as npimport torchimport time# 创建随机矩阵n = 500np_matrix_a = np.random.rand(n, n)np_matrix_b = np.random.rand(n, n)torch_matrix_a = torch.rand(n, n)torch_matrix_b = torch.rand(n, n)# NumPy矩阵乘法start_time = time.time()np_result = np.dot(np_matrix_a, np_matrix_b)numpy_time = time.time() - start_time# PyTorch矩阵乘法(CPU)start_time = time.time()torch_result_cpu = torch.mm(torch_matrix_a, torch_matrix_b)torch_cpu_time = time.time() - start_time# PyTorch矩阵乘法(GPU)if torch.cuda.is_available(): # 将数据移到GPU torch_matrix_a = torch_matrix_a.to('cuda') torch_matrix_b = torch_matrix_b.to('cuda') start_time = time.time() torch_result_gpu = torch.mm(torch_matrix_a, torch_matrix_b) torch_gpu_time = time.time() - start_timeelse: torch_gpu_time = -1 print("未支持CUDA")print(f"NumPy 矩阵乘法耗时: {numpy_time} 秒")print(f"PyTorch 矩阵乘法(CPU)耗时: {torch_cpu_time} 秒")print(f"PyTorch 矩阵乘法(GPU)耗时: {torch_gpu_time} 秒")NumPy 矩阵乘法耗时: 0.0058977603912353516 秒
PyTorch 矩阵乘法(CPU)耗时: 0.003974199295043945 秒
PyTorch 矩阵乘法(GPU)耗时: 0.00033020973205566406 秒
总结
希望能收到您的反馈!!!2023年11月30日15:11:42
参考
学习资料
书籍

 扫码加好友,拉您进群
 全部版块
全部版块 我的主页
我的主页

 收藏
收藏


