经管之家App
让优质教育人人可得
立即打开


租用 GPU 服务器后,通常会获得以下信息:
proxy.cn-south-nas-1.gpu-instance.ppinfra.com58914root# Windows 用户使用 CMD 或 PowerShell
ssh -p 58914 root@your-server-address
# 首次连接会提示验证主机密钥指纹,输入 yes 确认# 查看 GPU 信息
nvidia-smi
# 查看 CUDA 版本
nvcc --version
# 查看系统信息
uname -a
lsb_release -a# 创建新用户(例如:wuzz)
adduser wuzz
# 系统会提示设置密码和其他信息
# 密码是必须的,其他信息可以直接回车跳过如果用户需要执行管理命令:
# 将用户添加到 sudo 组
usermod -aG sudo wuzz

# 验证用户权限
groups wuzz# 确保用户有有效的登录 Shell
usermod -s /bin/bash wuzz
# 验证配置
cat /etc/passwd | grep wuzz
# 应显示:wuzz:x:1001:1001:,,,:/home/wuzz:/bin/bash如果是 Docker 容器环境,可能需要手动启动 SSH(通常每次关闭后重启会需要再次启动 SSH 服务):
# 检查 SSH 服务状态
ps aux | grep sshd

# 启动 SSH 服务
service ssh start

# 设置开机自启(如果支持 systemd)
systemctl enable ssh# 编辑 SSH 配置文件
vi /etc/ssh/sshd_config
# 或使用 sed 命令直接修改
sed -i 's/^#PasswordAuthentication yes/PasswordAuthentication yes/' /etc/ssh/sshd_config
# 验证修改
grep "^PasswordAuthentication" /etc/ssh/sshd_config
# 重启 SSH 服务
service ssh restart对于容器化环境,需要了解端口映射关系:
查看服务商提供的 TCP 端口映射信息,确认正确的外部端口。
现在你已经可以正常通过你的用户名访问啦
# Windows 用户使用 CMD 或 PowerShell
ssh -p 端口号 用户名@your-server-addressWinSCP 连接配置:
推荐使用 Miniconda,按需安装所需包。
# 切换到普通用户
su - wuzz

# 方法一:使用官方源
wget https://repo.anaconda.com/miniconda/Miniconda3-latest-Linux-x86_64.sh

# 方法二:使用国内镜像(更快)
wget https://mirrors.aliyun.com/anaconda/miniconda/Miniconda3-latest-Linux-x86_64.sh

# 或 Anaconda 完整版
wget https://repo.anaconda.com/archive/Anaconda3-2024.10-1-Linux-x86_64.sh# 给安装脚本执行权限
chmod +x Miniconda3-latest-Linux-x86_64.sh
# 运行安装程序
bash Miniconda3-latest-Linux-x86_64.sh
# 安装过程中的选项:
# 1. 按 Enter 阅读许可协议
# 2. 输入 yes 接受协议
# 3. 按 Enter 确认安装位置(默认:/home/wuzz/miniconda3)
# 4. 输入 yes 初始化 conda# 重新加载配置文件
source ~/.bashrc
# 验证安装
conda --version
python --version# 配置清华镜像源
cat > ~/.condarc << 'EOF'
channels:
- defaults
show_channel_urls: true
default_channels:
- https://mirrors.tuna.tsinghua.edu.cn/anaconda/pkgs/main
- https://mirrors.tuna.tsinghua.edu.cn/anaconda/pkgs/r
- https://mirrors.tuna.tsinghua.edu.cn/anaconda/pkgs/msys2
custom_channels:
conda-forge: https://mirrors.tuna.tsinghua.edu.cn/anaconda/cloud
pytorch: https://mirrors.tuna.tsinghua.edu.cn/anaconda/cloud
EOF
# 清除索引缓存
conda clean -i# 创建指定 Python 版本的环境
conda create -n mamba python=3.10
# 查看所有环境
conda env list
# 激活环境
conda activate mamba
# 退出环境
conda deactivate# 删除环境
conda remove -n mamba --all
# 克隆环境
conda create -n mamba_backup --clone mamba
# 导出环境配置
conda env export > environment.yml
# 从配置文件创建环境
conda env create -f environment.yml# 激活虚拟环境
conda activate mamba
# 查看 CUDA 版本
nvidia-smi
# 根据 CUDA 版本安装 PyTorch(示例:CUDA 11.8)
conda install pytorch torchvision torchaudio pytorch-cuda=11.8 -c pytorch -c nvidia
# 或使用 pip 安装
pip install torch torchvision torchaudio --index-url https://download.pytorch.org/whl/cu118
# 验证安装
python -c "import torch; print(torch.__version__); print(torch.cuda.is_available())"# 安装 TensorFlow GPU 版本
pip install tensorflow[and-cuda]
# 验证安装
python -c "import tensorflow as tf; print(tf.__version__); print(tf.config.list_physical_devices('GPU'))"# 数据处理
pip install numpy pandas scikit-learn
# 图像处理
pip install opencv-python pillow albumentations
# 可视化
pip install matplotlib seaborn tensorboard
# 模型训练工具
pip install tqdm wandb
# Hugging Face 生态
pip install transformers datasets accelerate获取 Hugging Face Token:
# 安装 huggingface_hub
pip install huggingface_hub

# 登录方式一:命令行
python -m huggingface_hub.commands.huggingface_cli login

# 登录方式二:Python 代码
python -c "from huggingface_hub import login; login(token='your_token_here')"

# 登录方式三:手动创建 token 文件
mkdir -p ~/.cache/huggingface
echo "your_token_here" > ~/.cache/huggingface/token# 编辑 ~/.bashrc
vim ~/.bashrc
# 添加以下内容
export CUDA_VISIBLE_DEVICES=0 # 指定使用的 GPU
export HF_HOME=/home/wuzz/.cache/huggingface # Hugging Face 缓存目录
export TORCH_HOME=/home/wuzz/.cache/torch # PyTorch 缓存目录
# 重新加载配置
source ~/.bashrc# 创建数据集目录
mkdir -p ~/datasets
mkdir -p ~/models
mkdir -p ~/checkpoints
# 设置软链接(可选)
ln -s /data/shared/datasets ~/datasets问题:
Permission deniedConnection refused解决方案:
# 检查 SSH 服务是否运行
ps aux | grep sshd

# 启动 SSH 服务
service ssh start

# 检查密码认证是否启用
grep "^PasswordAuthentication" /etc/ssh/sshd_config

# 如果未启用,修改配置
sed -i 's/^#PasswordAuthentication.*/PasswordAuthentication yes/' /etc/ssh/sshd_config
service ssh restart问题:PyTorch 无法检测到 GPU
解决方案:
# 检查系统 CUDA 版本
nvidia-smi

# 卸载当前 PyTorch
pip uninstall torch torchvision torchaudio

# 安装匹配的版本(根据 CUDA 版本)
pip install torch torchvision torchaudio --index-url https://download.pytorch.org/whl/cu118问题:训练时提示磁盘空间不足
解决方案:
# 查看磁盘使用情况
df -h

# 清理 conda 缓存
conda clean --all

# 清理 pip 缓存
pip cache purge

# 删除不用的环境
conda env remove -n old_env_name问题:无法通过外部端口连接(注意看端口,root 的端口不是从外部进行连接的端口,这个 TCP 端口才是外部连接的端口)
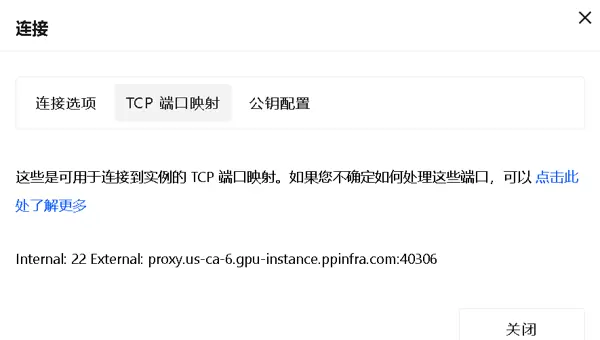
解决方案:
ssh -p 22 user@localhost如果本地可连但外部不行,联系服务商检查端口转发
问题:pip/conda 安装包非常慢
解决方案:
# 配置 pip 国内镜像
pip config set global.index-url https://pypi.tuna.tsinghua.edu.cn/simple

# 或使用阿里云镜像
pip config set global.index-url https://mirrors.aliyun.com/pypi/simple/

# conda 已在前面配置镜像源完成以上步骤后,你应该拥有:
现在你可以开始愉快地训练模型了!????
本文档基于实际配置经验整理,如有问题欢迎交流讨论。来自一个大三学生的分享

 扫码加好友,拉您进群
 全部版块
全部版块 我的主页
我的主页

 收藏
收藏


